Thursday, November 30, 2006

learning about MOSFETS and gain

Crocodile Clips only has two configurable parameters for a n-channel MOSFET: the gain factor and the threshold voltage. Since the other voltages (i.e. drain-source, gate-source, etc.) and parameters are not configurable for the sake of simulations, I'll guess that the voltage and current specs are limits for the sake of breakdown and focus on gain and threshold until I learn more. None of the data sheets that I have looked at speak of a 'gain factor', but I read that forward transconductance what Croc Clips means by gain factor.
simple circuit using IRF7101 specssimple circuit using IRF7303 specssimple circuit using IRF531 specs

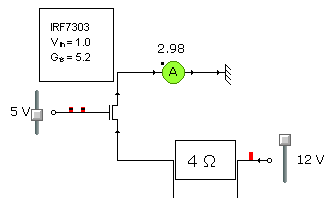
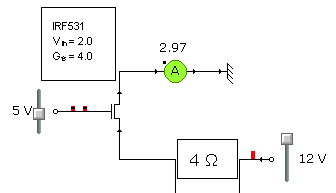
In the pictures above, I have changed the MOSFET parameters in Croc Clips to use the threshold voltage and gain factor from the data sheets for the IRF7101, IRF7303, and IRF531. The IRF7101 is used in the Roctronics circuits, so I'm using that as a baseline in the simulations. The IRF7303 is more readily available now, so we're considering it in our schematics for our implementation of the Roctronics boards. The IRF531 is available locally and in the nice TO-220 package that make bread-boarding easy. In short, it appears that our requirements are basic enough that we can use any of the MOSFETs we are looking at.

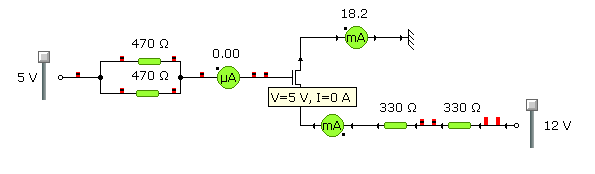
In my previous post, I wonder about the resistance from gate to source... heh, I now have a better understanding of the 'field-effect' part of MOSFET (and I already know that the MOS part is obsolete). There is 'practically no input current' on the gate - you can see in this simulation that Croc Clips assumes none:
picture of my original circuit that had the unnecessary resistors

So for the most part, when we pass the voltage threshold on the gate, the MOSFET turns on. Below are some rules that I picked up on a Web site talking about the scaling effects of MOSFETs - I may have interpretted the gain part of the equations incorrectly. Even if these aren't completely accurate - they appear to be pretty decent guides based on my playing with the Crocodile Clips.

drain-source current:
cutoff: 0 when Vg < Vt (i.e. 3.8 < 4)
linear: GainFactor * ((Vg - Vt) Vd - (Vd^2 / 2)) when 0 < Vd < Vg - Vt
saturation: (GainFactor / 2) * (Vg - Vt)^2 when 0 < Vg - Vt < Vd

oops ... pop :( learning about MOSFETs

In books, the descriptions of MOSFETs are so simple; look at a MOSFET data sheet and it isn't quite so simple. The most big question in my mind is the drain current min - why is there a min. Does that mean that the MOSFET can support at least that specific current?

The IRF531 looked nice, so I bought a couple to learn with. I'm have a pretty basic multimeter and a limited set of resistors, so I bread-boarded some circuits with the intent of getting a most basic understanding. Here are my notes in preparation for bread-boarding and testing:

Specific Constraints
- 0-25 mA and 0-250 mA test ranges on multimeter
- 330 ohm and 470 ohm resistors are only small resistors available
- both types of small resistors are 1/2 watt resistors

Playing with MOSFET
- assuming no resistance at all on gate-source
- circuit: +5 ... 235ohm ... gate-source ... Gnd
- 21 mA used
- if resistance on gate-source, then current used will be smaller
- assuming negligable resistance (< 1ohm) on drain-source
- circuit: +12 ... 660ohm ... drain-source ... Gnd
- 18 mA used
- if 5V @ 20 mA isn't enough to turn MOSFET on, then current will be smaller


You know what's coming - after careful consideration of my constraints and building my circuit, I blew the fuse in my multimeter! I have no spares, so I'll have to finish testing tomorrow :( My mistake, besides doing this in real life rather than with Crocodile Clips, was that I didn't plan my volt versus amp metering locations. Live and learn - at least I lived...

3D representation of the MOSFET test using Croc Clips

Now that is the smart way to learn! The 3D view is pretty and neato, but what I'm not showing is the schematic with ammeter and voltmeters installed. Good stuff!

Tuesday, November 28, 2006

talking to the uMMC

I hooked up the uMMC to the PC tonight. I couldn't find an MMC or SD card around, so I just had to verify the connection and query the status of the system.
picture of the uMMC breadboarded and connected to a PC
The first command I used was Z which queries the system status - the return was error code E08: Card not inserted; the other command I typed was V to request the system version and serial number - the return is kinda funny: VVV.MM SN:UMM1-NNNN-NNNN is expected, but I got 101.56 SN:UMM1-OEM - I have no serial number...

Ah well - nice to have something work. In the breadboard, I have the Vcc and Gnd on the uMMC going directly to the 5V from my power supply; the G, T, and R on the uMMC connect to the TTL Gnd, TTL Tin, and TTL Rout on the MAX232 (Sipex in this case); finally, the PC Serial has Gnd (5), Tx (3), and Rx (2) connected to the Gnd, RS-232 Rin, and RS-232 Tout. The PC serial uses 8N1 w/ no flow control @ 9600 as the default.

Monday, November 27, 2006

communication with AVR established!

By a bizzare turn, I happened to get communication with the AVR established - I have uploaded my program! :) Funny how things happen - I had given up on getting the AVR programmed via the parallel port and was going to try a serial method that Michael had found; I was closing out tabs in my browser and one happened to be pointing at this post about disabling the parallel port on the VMWare site. It made me suspect that my parallel port in my VM was not set for bidirectional communication, so I manually edited my VMX file to add 3 lines... and it worked!

parallel0.present = "TRUE"
parallel0.fileName = "LPT1"
parallel0.bidirectional = "TRUE"


Assuming the same old error as before, I ran uisp and got a nice little surprise!

uisp -dlpt=/dev/parport0 --erase -dprog=dapa
Atmel AVR ATtiny2313 is found.
Erasing device ...
Reinitializing device
Atmel AVR ATtiny2313 is found.
uisp -dlpt=/dev/parport0 --upload if=avrledtest.hex -dno-poll -dprog=dapa -v=3 --hash=32
Reset inactive time (t_reset) 1000 us
AVR Direct Parallel Access succeeded after 0 retries.
Vendor Code: 0x1e
Part Family: 0x91
Part Number: 0x0a
Atmel AVR ATtiny2313 is found.
Page Write Disabled
FLASH Write Delay (t_wd_flash): 11111 us
EEPROM Write Delay (t_wd_eeprom): 11111 us
Uploading: flash
#####
(total 138 bytes transferred in 1.71 s (81 bytes/s)
Now - if only my code worked right :) But that is my own bug and I can fix that!

One other great thing that I learned in this experience is that the Add / Remove Programs wizard (in Ubuntu) has an Advanced tab that allows you to select specific packages. Michael pointed out the Advanced tab and that uisp is in the package list! Good stuff.

Tuesday, November 21, 2006

mission failure - how to load AVR

I had the simple task of loading my program onto the AVR tonight to see it execute my own code for the first time; I should have suspected there was no hope. The task was too simple.
sad picture of breadboarded AVR waiting for a program to run
I found that I didn't have uisp loaded on Ubuntu already - no worries, I thought. I'll just build it... './configure --prefix=/usr/local/avr'. Boom - g++ not available on the Ubuntu install that I'm using. I checked the Applications - Add / Remove and I don't see it, but it must be added through some other process. So I resorted to my backup plan - install avrdude. No joy there, either: don't have yacc installed.

Back in the day when the whole system was compiled and you knew what was on it, installing g++ or yacc was a no-brainer. It is probably still a no-brainer, but ... all I want to do is load my program onto the AVR - why am I installing a new compiler or compiler compiler?! *sigh* Tired from Linux rot.

Saturday, November 18, 2006

no need to build boards!

picture of the last board that I madeThis is the last board that I etched myself - I don't enjoy the process at all. Michael found BatchPCB and we get etching, solder mask, silk screen, and the holes drilled! Woohoo! We haven't tried the service yet, but probably soon.

Thursday, November 16, 2006

large capacitors

We have read that 3300+ uF capacitors could be the key to reliable ejections, so here I am playing with a 4700 uF capacitor running through 430ohms for draining it to see what kind of current I get. Good stuff!

breadboarding with large caps

After that goodness, I cleared the board and build the Roctronics AVR Controller (minus the MOSFETS and EEPROM) and RS232 Interface. I found that Jameco substituted a Sipex chip for the Maxim MAX233 that I had ordered; no problem there, just figure I should link to the correct data sheet.

Friday, November 10, 2006

spicy ubuntu

Until today, my main reason for liking Ubuntu was that is was a simple multi-user system without a root / administrator account to set up. After an unsuccessful attempt to build SPICE, I looked on the forums and learned about the various repositories for Ubuntu programs. Hitting the repositories is easy - I just hadn't ever tried the Ubuntu Add / Remove Programs before :)

So here's a nice resource that I bumped into on the forums: Ubuntu Scientists It shows projects like Oregano and gEDA and what repository they are in. Good stuff.

Thursday, November 09, 2006

preparing to build rocket electronics

The Roctronics projects was active a couple years ago, but there isn't anything completely buildable there at the moment. Michael is redesigning the harness and controller boards with available parts so that we can move forward with a first implementation.

For my own reference, this is a list of parts that I have ordered and the data sheets:
39357-0002 - Eurostyle Terminal Block (for connecting power and ejection charges)
PIC16F628-20/SO - PIC Microcontroller
ATtiny2313 - AVR Microcontroller
254-PB521 - 100dB Buzzer (to mount in electronics bay of rocket for locating)
BZX79C5V6 - 5.6V Zener Diode
SN74LS00N - standard logic IC
SN74LS04N - standard logic IC
SN74LS07N - standard logic IC
SN74LS90N - standard logic IC
CD40110BE - standard logic IC
L7805ABV - 5.0V 1.0A positive voltage regulator
L7812ACV - 12V 1.0A positive voltage regulator
MAX233CPP - RS232 driver / receiver
PN2907A - standard PNP transitor

A beautiful thing about electronics is that most of the parts are in the $0.10 range, so I could order a bunch and deal with mistakes :)

first use of wikibooks

Most people are already familiar with the Wikipedia and may already be familiar with Wikibooks; however, I just ran into Wikibooks for the first time. Impressive stuff, in my opinion.

I was having a hard time finding a MAX233 chip required by a circuit, but I kept seeing a MAX232A and MAX233CPP. A Google search led me to this great serial programming book. Good stuff.

Wednesday, November 01, 2006

Ready for Recovery

The LOC/Precision Bullet came with a 12' elastic bungie cord for use as the recovery harness. Based on my reading in Modern High-Power Rocketry 2, I decided to replace the recovery harness. I already built in a U-bolt on the forward centering ring in the motor mount, so I can anchor to that rather than use the LOC SCM 1 harness mount. I picked up 3 quick-links from Home Depot and 16' of Kevlar shock cord.

The main problems with the elastic bungie are that it won't last like Kevlar since it lives in the booster airframe (because of ejection charges), it can break easily, and it is elastic and may cause the ejected nose cone to bounce back into the booster and do damage. The main risk with Kevlar is that it could result in zippers if the ejection wasn't timed well or if the shock cord was too short.

I expect to plan my flights using wRASP and RockSim, so I hope to get my timings set good enough to prevent serious damage. In addition, using the 16' of shock cord falls in the guideline of making the shock cord at least 2 to 3 times the length of the rocket so the bodies have some time to slow down before the cord gets pulled.

So anyway - the reason for this post was so I could write down somewhere the weights of the recovery harness. The chute, quick links, and shock cord weight a total of 6.7 ounces. The chute is still the original 36" rip-stop nylon.