

Saturday, December 26, 2009
sledding fun
Has fun sledding today - great hill! Adam and Griffin were there so that was extra fun for the kids. Blake and Kimberly sledded a bit with Asher and even pulled him up the hill a couple times! :)
Friday, December 18, 2009
moving servo via pot; even has a blinking LED
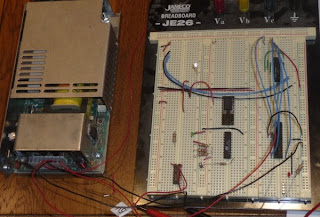
After 2 days without electronics due to illness, I am feeling better and was happy to pull out the stuff. Shanelle wasn't so happy but we watched a movie while I played. I read the oscillator section in the 18F2455 datasheet and felt a lot more comfortable with the oscillator config; in addition, I learned that PWM uses timer 2 so I learned about the pre / post scalers there. I set everything up and was confident that I had the correct timing values but wasn't getting reliable servo movement (servo wasn't dancing either so I was thinking that I had made progress). Michael suggested batteries; I set up an LM7805 and tried driving the servo off my crappy power supply again but using 12V + LM7805; servo still pulsing; Michael suggested batteries. I tried batteries on the servo and now had a stable servo :)
I added a potentiometer to the circuit and adjusted the code to read the pot and position the servo accordingly. I put a video on youtube and then shortened the delay between reads. We're really getting somewhere now :) This code is responsive and good enough to pass along to Greg for testing with a valve and servos while I work on it more to actually considering the pressures and what they mean.
I added a potentiometer to the circuit and adjusted the code to read the pot and position the servo accordingly. I put a video on youtube and then shortened the delay between reads. We're really getting somewhere now :) This code is responsive and good enough to pass along to Greg for testing with a valve and servos while I work on it more to actually considering the pressures and what they mean.
#include
#include
#include
#include

// app uses internal oscillator, RA6 for IO
#pragma config FOSC = INTOSCIO_EC
// OSCCON = 0b01110000; should switch to 8Mhz ??

#pragma config BOR = OFF // Brown out reset
#pragma config LVP = OFF // Low voltage programming
#pragma config WDT = OFF // Watchdog timer

// use pin 11 for basic LED indicator
#define LEDPin LATCbits.LATC0
#define LEDTris TRISCbits.TRISC0

void main() {
 // pre / post scalers at 1:16 / 1:2
 T2CONbits.T2CKPS1 = 1;
 T2CONbits.T2CKPS0 = 1;
 T2CONbits.T2OUTPS3 = 0;
 T2CONbits.T2OUTPS2 = 0;
 T2CONbits.T2OUTPS1 = 0;
 T2CONbits.T2OUTPS0 = 1;

 // the period is 25ms
 OpenPWM1(250);

 // TODO - understand all these flags
 OpenADC(ADC_FOSC_8 & ADC_RIGHT_JUST & ADC_0_TAD,
  ADC_CH0 & ADC_INT_OFF & ADC_VREFPLUS_VDD & ADC_VREFMINUS_VSS,
  0b1011);
 SetChanADC(ADC_CH0);

 LEDTris = 0; // make sure LED pin is an output pin
 LEDPin = 1; // turn LED on
 while(1) {
  LEDPin = ~LEDPin;
  Delay10KTCYx(5); // (.2s delay between reads)

  ConvertADC();
  while(BusyADC());
  // through experimentation, I found that a 'duty cycle' between
  // 18 and 81 was about right; my pot in my circuit is giving
  // 0 to 4.2V so I'm multiplying by 1.2; the ReadADC returns a
  // 10 bit result so dividing by 16 to put me 0 to 63
  SetDCPWM1(18 + ((int) (1.2 * ReadADC()) >> 4));
 }
}
Tuesday, December 15, 2009
first time with MPLAB and PIC
Edward, Greg, and I have been Waving about a Fantasy Throttleable Hybrid rocket. The electronics for the rocket are interesting to me, and the machining of the rocket parts is beyond my abilities, so I'm setting up an environment to work on the controller for the rocket. I'm new to programming the PIC but am interested since it is used in so many projects.
It seems common for hobbyists to develop in ASM for the PIC but I chose C. To get some hand-holding, I went through Tutorial 4 at pic18f.com and it was exactly what I needed from an introduction. Here are a few bits that I had to bump into myself.
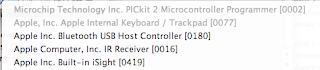
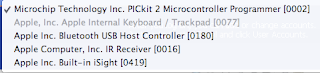
I use a MacBook as my primary machine and do most things related to rocketry within a WinXP VM using VirtualBox. I figured I would simply plug in the PICkit2 (it is USB), assign it to my VM, and go on with the Tutorial. When I plugged in the PICkit2, it appeared in the USB list in my VM but it was Unavailable. I checked the VirtualBox forums and there were some special chicken dances that people claim work but the following steps appear to be reliable for me.
Here are some pictures:

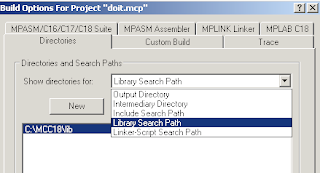
It is mentioned in the tutorial that the Library Search Path will probably need to be set but I assumed that since I went with all defaults on my install that it would be already set. It wasn't - I got a build error telling me that c018i.o was not found. I just went in to Build Options..., clicked on Directories tab, changed the drop-down to Library Search Path, and set the value to C:\MCC18\lib.
Just like the Tutorial said, you can say "Programmer -> Release from Reset" to run the app that is in Flash on the PIC. You can do "Programmer -> Set Vdd Off" to turn the PIC off. Neato - easy peasy.
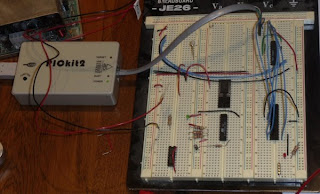
Once the PIC is programmed, you can remove the PICkit2 and plug in a 5V power supply. Positive goes to pin 20 on the 18F2455 that I'm using and Ground goes to pins 8 and 19. As soon as power is turned on, the app in Flash runs.
It seems common for hobbyists to develop in ASM for the PIC but I chose C. To get some hand-holding, I went through Tutorial 4 at pic18f.com and it was exactly what I needed from an introduction. Here are a few bits that I had to bump into myself.
PICkit2 Kinda Tricky with VirtualBox
I use a MacBook as my primary machine and do most things related to rocketry within a WinXP VM using VirtualBox. I figured I would simply plug in the PICkit2 (it is USB), assign it to my VM, and go on with the Tutorial. When I plugged in the PICkit2, it appeared in the USB list in my VM but it was Unavailable. I checked the VirtualBox forums and there were some special chicken dances that people claim work but the following steps appear to be reliable for me.
- Set up USB Filter for PICkit2 and put at top of VM config.
- Boot VM
- Plug in PICkit2 at Windows log-in screen.
Here are some pictures:


MPLAB Library Path needs setting
It is mentioned in the tutorial that the Library Search Path will probably need to be set but I assumed that since I went with all defaults on my install that it would be already set. It wasn't - I got a build error telling me that c018i.o was not found. I just went in to Build Options..., clicked on Directories tab, changed the drop-down to Library Search Path, and set the value to C:\MCC18\lib.

Run App using PICkit2 / USB Power
Just like the Tutorial said, you can say "Programmer -> Release from Reset" to run the app that is in Flash on the PIC. You can do "Programmer -> Set Vdd Off" to turn the PIC off. Neato - easy peasy.

Run App using External Power
Once the PIC is programmed, you can remove the PICkit2 and plug in a 5V power supply. Positive goes to pin 20 on the 18F2455 that I'm using and Ground goes to pins 8 and 19. As soon as power is turned on, the app in Flash runs.

Monday, November 23, 2009

Thursday, October 29, 2009
isaac in office

I suppose this is the real reason Isaac cleaned the office - he has set up his computer and is now 'working' with me.

Sunday, October 25, 2009


Wednesday, October 21, 2009

Wednesday, October 14, 2009

Monday, October 12, 2009
rocket repairs and thor
I am a huge fan of the kits from Semroc and my Explorer and Arcas have been flying for a couple years. My most recent flight on the Arcas used an F42T and 2 of the fins were ripped off. I was never real happy with my fin alignment on the Arcas so I took the opportunity to remove all the fins and reseat them. The fins are all in place and this time I used a bit more epoxy and fiberglass filler. The Arcas is in serious need of a paint job but I think that these fins will be solid!
The Explorer had a cracked fillet. The crack survived a few flights on E motors but I wouldn't be confident putting an F in it as it was. I ground out the old fillet, sanded, and then put in a few fillet. I love this rocket and have flown it at many parks and both NCR launch sites. I plan to fly it at the Nov NCR launch (if my Shanelle lets me go).
I'm finally making progress on the Thor. Curtis has been making a lot of noise and I'm even thinking he really is going to get the airframe to me. I used JB Weld to attach the fins to the motor mount tube and am now in the process of putting in large JB Weld fillets. Sometime in the near future, Warren M is going to help me do tip to tip fiberglassing on the fins and then when the airframe arrives it will pretty much just slip on.


Thursday, October 08, 2009
Snowing a bit in Boulder

That's not keeping Zoe from checking for rabbits during break-time. She's found a couple this week but, fortunately for me, hasn't caught any.
Monday, October 05, 2009
App Engine Redirects - some good some bad
I'm working on authn and authz for my app that uses App Engine. I was hoping to force HTTPS and make it so DELETE was only available App Engine administrator (i.e. me and others on the project). The force of HTTPS is obviously done in config and I would prefer the DELETE authz info in config as well because it would save a lot of coding.
After setting that in my web.xml file and deploying, I was able to immediately curl and browse and verify that http redirects to https.
Super duper.
I was hoping for a 403 there. I guess it isn't bad but I don't like it that an auth failure gives a 302 status rather than 403. Thinking about now whether I want to stick with this convenience or move the authz for DELETE to code and return my 403 status.
 <security-constraint>
  <web-resource-collection>
   <web-resource-name>default</web-resource-name>
   <url-pattern>/*</url-pattern>
  </web-resource-collection>
  <user-data-constraint>
   <transport-guarantee>CONFIDENTIAL</transport-guarantee>
  </user-data-constraint>
 </security-constraint>
 <security-constraint>
  <web-resource-collection>
   <web-resource-name>admin</web-resource-name>
   <url-pattern>/buckets/200908/bucket/*</url-pattern>
   <http-method>DELETE</http-method>
  </web-resource-collection>
  <auth-constraint>
   <role-name>admin</role-name>
  </auth-constraint>
 </security-constraint>
After setting that in my web.xml file and deploying, I was able to immediately curl and browse and verify that http redirects to https.
$ curl -i -X GET http://mrtidy.appspot.com/buckets/200908/bucket/
HTTP/1.1 302 Found
Location: https://mrtidy.appspot.com/buckets/200908/bucket/
Date: Mon, 05 Oct 2009 02:14:42 GMT
Content-Type: text/html
Server: Google Frontend
Content-Length: 0
X-XSS-Protection: 0
Super duper.
$ curl -i -X DELETE https://mrtidy.appspot.com/buckets/200908/bucket/1
HTTP/1.1 302 Found
Location: https://www.google.com/accounts/ServiceLogin?service=ah&continue=https://mrtidy.appspot.com/_ah/login%3Fcontinue%3Dhttps://mrtidy.appspot.com/buckets/200908/bucket/1<mpl=gm&ahname=...2
Date: Mon, 05 Oct 2009 02:22:26 GMT
Content-Type: text/html
Server: Google Frontend
Content-Length: 0
X-XSS-Protection: 0
I was hoping for a 403 there. I guess it isn't bad but I don't like it that an auth failure gives a 302 status rather than 403. Thinking about now whether I want to stick with this convenience or move the authz for DELETE to code and return my 403 status.
Sunday, October 04, 2009
Beautiful in Broomfield!

Terrible weather at the launch site this morning but it is great in Broomfield. I think Zoe is pleased at having to ditch the launch early and come home to play.
Waver closed NCR 20091004
Bad weather again this morning so the waver was closed and we've taken down the pads. Vendors are gone too.
Saturday, September 26, 2009


Saturday, September 19, 2009


Friday, September 18, 2009
gas overnight
James says mixes that use Mg or Al (possibly any metals?) mix til
change then gas overnight - good for density and also splits process
to 2 days.
change then gas overnight - good for density and also splits process
to 2 days.
Tuesday, September 15, 2009
Deer at the Office
I was attempting to take a picture of the giant deer resting by the truck but you can't see it at all (well, you can see it's butt but the head and antlers were the impressive part). I thought the picture turned out nice so I'm posting it :)


Thursday, September 03, 2009
trouble with ViewFlipper
I got totally side-tracked in my Android app trying to do a quick implementation of onFling. The intent was to not have to worry about my GridView filling up with buckets - I thought I could just max out the current view at 9 and implement onFling to take in the swipe gesture from the user to move over and look at the next (or previous) 9 buckets.
My first surprise was that it was harder than I expected! I shouldn't have been surprised :) Seriously, I thought that I could just wrap my existing view with the ViewFlipper and provide an index for 'paging'. I ended up implementing (hard-coding) 3 static pages with the intention of just ignoring the swipe if there weren't any next / previous screens. My second surprise was that I couldn't get the onFling / GestureDetector to fire. I thought I had grown a solid understanding of Android but sheesh - this should be trivial stuff.
Added to onCreate
Then I added this inner class. Just a quick reminder, this doesn't currently work - I'm just recording the notes here.
Blah blah blah - just a distraction. I need to get back to fixing sync'ing and adding buckets.
My first surprise was that it was harder than I expected! I shouldn't have been surprised :) Seriously, I thought that I could just wrap my existing view with the ViewFlipper and provide an index for 'paging'. I ended up implementing (hard-coding) 3 static pages with the intention of just ignoring the swipe if there weren't any next / previous screens. My second surprise was that I couldn't get the onFling / GestureDetector to fire. I thought I had grown a solid understanding of Android but sheesh - this should be trivial stuff.
Added to onCreate
        mViewFlipper = (ViewFlipper) findViewById(R.id.main_flipper);
        mGestureDetector = new GestureDetector(new FlingGestureDetector());
        mGestureListener = new OnTouchListener() {
            public boolean onTouch(View v, MotionEvent event) {
                Log.d(getClass().getSimpleName(), "HERE onTouch");
                if (mGestureDetector.onTouchEvent(event)) {
                    return true;
                }
                return false;
            }
        };
Then I added this inner class. Just a quick reminder, this doesn't currently work - I'm just recording the notes here.
    class FlingGestureDetector extends SimpleOnGestureListener {
        @Override
        public boolean onFling(MotionEvent eventStart, MotionEvent eventEnd, float velocity, float unusedVelocity) {
            Log.i(getClass().getSimpleName(), "onFling (" + eventStart + ", " + eventEnd + ", " + velocity + ")");

            try {
                if (Math.abs(eventStart.getY() - eventEnd.getY()) > FLING_MAX_DEVIATION) {
                    Log.d(MainActivity.class.getSimpleName(), "onFling too much Y in motion, not fling");
                    return false;
                }
                if (eventStart.getX() - eventEnd.getX() > FLING_MIN_DISTANCE && Math.abs(velocity) > FLING_MIN_VELOCITY) {
                    mViewFlipper.setInAnimation(AnimationUtils.makeInAnimation(MainActivity.this, true));
                    mViewFlipper.setOutAnimation(AnimationUtils.makeOutAnimation(MainActivity.this, true));
                    mViewFlipper.showNext();
                } else if (eventEnd.getX() - eventStart.getX() > FLING_MIN_DISTANCE && Math.abs(velocity) > FLING_MIN_VELOCITY) {
                    mViewFlipper.setInAnimation(AnimationUtils.makeInAnimation(MainActivity.this, false));
                    mViewFlipper.setOutAnimation(AnimationUtils.makeOutAnimation(MainActivity.this, false));
                    mViewFlipper.showPrevious();
                }
            } catch (Exception e) {
                Log.w(MainActivity.class.getSimpleName(), "onFling ignoring unexpected exception: " + e);
            }
            return false;
        }
    }

    OnTouchListener mGestureListener;

    /**
     * Most people will probably just have the 1 page of buckets but for the
     * people lucky enough to have more than 9 / 12 / whatever the number is,
     * they can fling thru the pages.
     */
    private int mViewIndex = 0;
Blah blah blah - just a distraction. I need to get back to fixing sync'ing and adding buckets.
Friday, August 28, 2009
Create ISO on Mac OS X
This should have been obvious to me but it wasn't so I'm blogging it to make sure I remember.
sudo umount /dev/disk1
dd if=/dev/disk1 of=~/Desktop/mydisk.iso bs=2048
Friday, August 14, 2009
hg clone with tag
hg clone -r WithSplits https://bergl@bitbucket.org/madsidy/buckfiiglaasd/
Golly, that's good.
Friday, July 24, 2009
upgraded to Android SDK 1.5r3 - perm problems
I upgraded to SDK 1.5r3 and updated my /usr/local/android link and then got errors in Eclipse: my projects wouldn't compile. I checked the error log and got distracted by an error that doesn't even matter:
The real problem with the SDK was that the $ANDROID_HOME/tools and $ANDROID_HOME/platforms/android_1.5/tools contained important executables but the files weren't actually executable. I did 'sudo chmod 755 *' in the tools directories and restarted Eclipse.
Plug-in com.android.ide.eclipse.adt was unable to load class com.android.ide.eclipse.adt.project.NewXmlFileWizardAction.
The real problem with the SDK was that the $ANDROID_HOME/tools and $ANDROID_HOME/platforms/android_1.5/tools contained important executables but the files weren't actually executable. I did 'sudo chmod 755 *' in the tools directories and restarted Eclipse.
Thursday, July 23, 2009
MercurialEclipse plugin has Finish disabled
If you're using the MercurialEclipse plugin and you attempt to Pull + Merge with un-committed changes, the Finish button will be disabled.
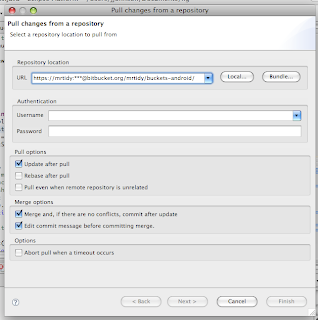
You can either Pull without Merge, which Mercurial will put into your local repository but you'll then have to merge manually later, or you can Cancel, check-in your current work, and then Pull with Merge.

You can either Pull without Merge, which Mercurial will put into your local repository but you'll then have to merge manually later, or you can Cancel, check-in your current work, and then Pull with Merge.
Tuesday, July 14, 2009
options for viewing changeset history
We switched to BitBucket / Mercurial for the Android application. Although I've been using Mercurial for a long time as an individual, this is my first attempt at Hg in a team environment. I'm dazzled by BitBucket - great UI and been real smooth so far.
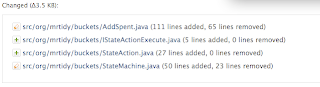
It isn't obvious how to see what files have changed in the various changesets. The options are to use the UI in BitBucket or to use the Team -> History view in Eclipse. It's nice to have everything in Eclipse, so that the main option for me: right click in Package Explorer -> Team -> Show History. If you don't already have the History view open, it will open up and show the history for your local repository. To see the files affected, click on the bullet-point looking icon in the upper right (the tooltip is 'Show Affected Paths').
Here's a clip of what it looks like in BitBucket - easy there, click on the changesets tab and then pick a changeset to view.
It isn't obvious how to see what files have changed in the various changesets. The options are to use the UI in BitBucket or to use the Team -> History view in Eclipse. It's nice to have everything in Eclipse, so that the main option for me: right click in Package Explorer -> Team -> Show History. If you don't already have the History view open, it will open up and show the history for your local repository. To see the files affected, click on the bullet-point looking icon in the upper right (the tooltip is 'Show Affected Paths').

Here's a clip of what it looks like in BitBucket - easy there, click on the changesets tab and then pick a changeset to view.

Thursday, July 09, 2009
migrating SVN history to Mercurial in BitBucket
I started setting up a Mercurial server tonight using http://mercurial.selenic.com/wiki/HgWebDirStepByStep and http://mercurial.selenic.com/wiki/RHEL4HgWebDirSetup I got pretty far in and realized there was still a long way to go and I would only have a partially working solution. The easier way to test Mercurial for our team would be with BitBucket. The steps I did to create my own server are shown below just for historical reasons.
BitBucket supports private projects, has the Web interface for Hg already set up, and has a wiki and bug tracker available. I created an account (traditional because I couldn't get my OpenID URL working - I'm slow), set up a private repository, and then 'pushed' in our existing source.
At this point, the BitBucket Overview and my private news feed show the repo history. Good stuff!
What I was doing...
BitBucket supports private projects, has the Web interface for Hg already set up, and has a wiki and bug tracker available. I created an account (traditional because I couldn't get my OpenID URL working - I'm slow), set up a private repository, and then 'pushed' in our existing source.
$ mkdir buckets
$ hg convert svn+ssh://[my svn server].org/svn/buckets buckets
$ cd buckets
$ hg push https://[my username]@bitbucket.org/[my username]/[my private repo]
At this point, the BitBucket Overview and my private news feed show the repo history. Good stuff!
What I was doing...
$ wget http://apt.sw.be/redhat/el5/en/i386/RPMS.dag/rpmforge-release-0.3.6-1.el5.rf.i386.rpm
$ sudo rpm --import http://dag.wieers.com/rpm/packages/RPM-GPG-KEY.dag.txt
$ sudo rpm -K rpmforge-release-0.3.6-1.el5.rf.*.rpm
$ sudo rpm -i rpmforge-release-0.3.6-1.el5.rf.*.rpm
$ sudo yum install mercurial
$ sudo yum install httpd
$ cd
$ wget http://selenic.com/repo/hg-stable/archive/tip.tar.gz
$ tar xzf Mercurial-stable-branch--*.tar.gz
$ sudo mkdir /var/www/cgi-hg
$ sudo cp Mercurial-stable-branch--*/hgwebdir.cgi /var/www/cgi-hg && sudo chmod +x /var/www/cgi-hg/hgwebdir.cgi
$ sudo vi /etc/httpd/conf.d/hg.conf
ScriptAliasMatch        ^/hg(.*)        /var/www/cgi-hg/hgwebdir.cgi$1

<Directory /var/www/cgi-hg/>
        Options ExecCGI FollowSymLinks
        AllowOverride None
</Directory>
^d
$ sudo touch /var/www/cgi-hg/hgweb.config
$ sudo /etc/init.d/httpd start
$ sudo chmod 755 /var/log/httpd
Sunday, June 14, 2009
Android logs with ADT (LogCat)
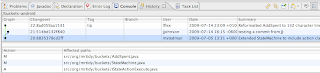
The LogCat view is on by default in the Debug perspective. I noticed that even when I'm not debugging the view is getting updates from the application running in the emulator. I added the LogCat view to my Java perspective so I can see it anytime.
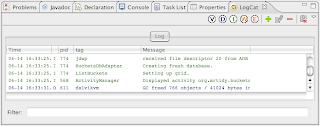
In the clip above, you can see that the LogCat view defaults in with the Problems, Console, and other views in the bottom-right. I like it there. The second column in the view shows the logging level; this level comes from the method called on the Log object. Here are the clips from my code that correspond to the 'I' messages.
Above, I used just a plain string for the 'tag'; this seems like the common approach in the Android sample code. Below, I went to my more normal use of using the class as the tag.
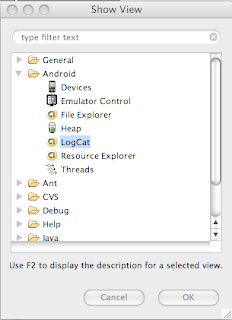
To add the LogCat view to the Java perspective:
1. open the workspace that houses your projects
2. Window -> Show View -> Other...
3. expand the Android tree node and select LogCat

In the clip above, you can see that the LogCat view defaults in with the Problems, Console, and other views in the bottom-right. I like it there. The second column in the view shows the logging level; this level comes from the method called on the Log object. Here are the clips from my code that correspond to the 'I' messages.
Log.i("ListBuckets", "Setting up grid.");
GridView g = (GridView) findViewById(R.id.bucket_list);
g.setAdapter(new ImageAdapter(this, mBucketsDb.fetchAllBuckets()));
Above, I used just a plain string for the 'tag'; this seems like the common approach in the Android sample code. Below, I went to my more normal use of using the class as the tag.
public void onCreate(SQLiteDatabase db) {
 Log.i(BucketsDbAdapter.class.toString(), "Creating fresh database.");
 db.execSQL(DATABASE_CREATE);
To add the LogCat view to the Java perspective:
1. open the workspace that houses your projects
2. Window -> Show View -> Other...
3. expand the Android tree node and select LogCat

Wednesday, June 10, 2009
Ike learning to IM
Isaac is 8 now so he is anxious to get online. He started using Pidgin yesterday and he's doing great. Here's a clip - he's even using smiley's :)


Wednesday, June 03, 2009
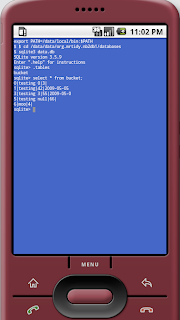
sqlite3 cli
Android gets better and better! I had a few minutes tonight to take a look at my current Android app and wanted to check the state of the DB. Expecting to find nothing, I Googled sqlite cli android and found that there are 2 methods. Beauty.
I thought that this would be the coolest but it was actually a paid because the UID is not root. The end result is that there are annoying permissions issues. It was pretty fun to be able to use the Term to check the DB:
Term in Emulator
I thought that this would be the coolest but it was actually a paid because the UID is not root. The end result is that there are annoying permissions issues. It was pretty fun to be able to use the Term to check the DB:

Shell via ADB
jjohnson:~ jjohnson$ adb shell
# cd /data/data/org.mrtidy.nb2db1/databases
# sqlite3 data.db
SQLite version 3.5.9
Enter ".help" for instructions
sqlite> .tables
bucket
sqlite> select * from bucket;
0|testing 0|3|
1|testing|42|2009-05-05
3|testing 3|55|2009-05-0
5|testing null|66|
6|moo|4|
sqlite>
Friday, May 22, 2009
learned a few things about Ubuntu and VirtualBox
My main goal tonight was to get through the different layout samples to get a better grasp on layout in Android. Unfortunately, work leaked so I had to do some Ubuntu and VirtualBox configuration. Turned out to be pretty interesting and reminded me how much I like Ubuntu.
I set up a VM instance - this was fine, went as normal. The new part here was that I wanted to use VBox snapshots. Once the VM was prepared, I exported the config and HD image to put on our filer system as part of my usual process. After the traditional style backup was done, I tried creating a Snapshot of the VM. Assuming the snapshots work, they're might simple: you get to give each snapshot a name and description. There are options to delete snapshots, remove current config, and a few other things.
As part of the preparation of the VM, I had to set up an application launcher in the VM image. I've done launchers before but this was a little new because I wanted the launcher on the desktop but the actual scripts within the home directory structure. The problem I hit was that the main script used relative paths to reference other scripts. The solution to my issue was here. I had assumed "cd {abs directory}; ./{script}" but it has to be 'sh -c "cd {abs directory} && ./{script}"'. Huh.
I set both the host and guest instances to perform Auto-Login to be easy for the line setup. In the host, I added a Startup Application to auto-start my guest. This reminds me how much I like VirtualBox: VBoxManage has lots of different options that I've found useful. In this case, I do 'Command: VBoxManage startvm "gateway configuration station"'. Since the VM is configured for full-screen, I ultimately end up at the desired UI after powering on the physical box. Good stuff!
Back on the Android stuff, I was pleased there as well: started bumping into the design surfaces in ADT and they look helpful, used the Debug perspective with an Android app running in the emulator (and breakpoints worked :)), and Android will deal with about anything for the icons.

Wednesday, May 20, 2009
first Android app
Google provides great tools to get started. The guys at work are Maven fanboys so they referred to a couple Maven-Android projects to use. I followed their lead and took the time to set up Masa but that was a total waste of time. The first part below is how a normal person should write the Hello World app and then the second part is how to get Masa set up, just in case you too are a Maven fanboy (or fangirl). There are some notes at the very end about using Eclipse / ADT but I think writing the first app with the Android tools is helpful.
Go to the Android SDK Download page and get the SDK. For the Mac, it is a ZIP file so I downloaded and unzipped and then edited ~/.bash_login to add ANDROID_SDK and put $ANDROID_SDK/tools in my path.
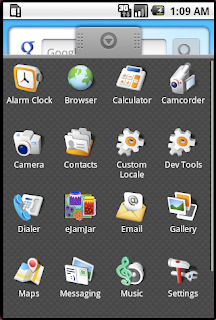
To be able to test apps, you need to set up an Android Virtual Device. As you get familiar, you'll probably have multiple AVD but create an API level 3 AVD to get started. I called my AVD basic. The steps below show me creating it and then starting it.
At this point, I see a window with a red phone. The screen on the phone is blank.
I called my app buckets and the main activity is called BucketOverviewActivity. The android create call writes out a template project and sets up the initial metadata. Everything is valid as-is so you can go straight from there to compile and install the app.
After the install step, the phone appears to turn on and the app is now available. The name of the app is BucketOverviewActivity and when I click on that I see the Hello World.


The Masa Web site appears to be stale and a different Maven project in GoogleCode has intentionally gone stale claiming that they are merging with Masa. I think that the problem is that the Ant tools provided with Android are good enough. Anyway, I spent all the time to get Masa setup so I may as well pass the info along.
Do the steps 1 and 2 above to get the Android SDK installed and in your PATH and to prepare an Emulator. Next, install Android JARs into the local Maven repository.
At this point, you can pull the Masa source and install Masa into the local repository.
Finally, you can take the sample pom.xml from the Masa Web site, update the versions, and put it into your project directory (that already has a find build.xml file for Ant) and use mvn.
The Android Developers Web site has great information for getting started with Eclipse and the Android Developer Tools plugin. Some parts that I think are important are that the code-path to create a new project using ADT is different than just using the Android tools. It isn't a real big deal but the best way to get a decent build script for a build machine is to use the Android create tool. I did find that I could drop a build.xml, build.properties, local.properties, and default.properties into the project directory of an Eclipse-created project and it built and behaved as I expected.
I tried Export -> Ant Build Files but that was terrible. Use android create at least once to get the good scripts. Once you get good build scripts, it would probably be smart to tell Eclipse to only use the Ant build script that was put in place but I'm going to live on the wild side and use the IDE build when doing interactive dev and Ant for 'real' builds.
ADT provides a graphical tool for managing the virtual devices, automatically assumed debug keys on Run As, and has the usual benefits of syntax highlighting and refactoring. There isn't an integrated tool for managing the emulators, that I have seen; that means that once an emulator is started, I have to kill it outside the IDE if it needs to be killed. Along the same lines, I've had a case where the IDE wouldn't start a new emulator but there was one running and ready to take an application image.
Android Tools
Step 1: Download Android SDK
Go to the Android SDK Download page and get the SDK. For the Mac, it is a ZIP file so I downloaded and unzipped and then edited ~/.bash_login to add ANDROID_SDK and put $ANDROID_SDK/tools in my path.
Step 2: Create an AVD
To be able to test apps, you need to set up an Android Virtual Device. As you get familiar, you'll probably have multiple AVD but create an API level 3 AVD to get started. I called my AVD basic. The steps below show me creating it and then starting it.
$ android create avd -n basic -t 3
Created AVD 'basic' based on Google APIs (Google Inc.)
$ emulator @basic
At this point, I see a window with a red phone. The screen on the phone is blank.
Step 3: Create an App and Install
I called my app buckets and the main activity is called BucketOverviewActivity. The android create call writes out a template project and sets up the initial metadata. Everything is valid as-is so you can go straight from there to compile and install the app.
$ cd ~/projects
$ mkdir buckets
$ cd buckets
$ android create project --target 2 --path . --activity BucketOverviewActivity --package com.unknown.buckets
$ ant debug install
After the install step, the phone appears to turn on and the app is now available. The name of the app is BucketOverviewActivity and when I click on that I see the Hello World.


Masa Setup
The Masa Web site appears to be stale and a different Maven project in GoogleCode has intentionally gone stale claiming that they are merging with Masa. I think that the problem is that the Ant tools provided with Android are good enough. Anyway, I spent all the time to get Masa setup so I may as well pass the info along.
Do the steps 1 and 2 above to get the Android SDK installed and in your PATH and to prepare an Emulator. Next, install Android JARs into the local Maven repository.
mvn -X install:install-file -Dfile=/usr/local/android//platforms/android-1.5/android.jar -DgeneratePom=true -DgroupId=android -DartifactId=android -Dversion=1.5_r1 -Dpackaging=jar
mvn -X install:install-file -Dfile=/usr/local/android//platforms/android-1.1/android.jar -DgeneratePom=true -DgroupId=android -DartifactId=android -Dversion=1.1_r1 -Dpackaging=jar
At this point, you can pull the Masa source and install Masa into the local repository.
cd ~/oss
svn co http://masa.googlecode.com/svn/trunk/ masa
cd masa
mvn install
Finally, you can take the sample pom.xml from the Masa Web site, update the versions, and put it into your project directory (that already has a find build.xml file for Ant) and use mvn.
Eclipse / ADT
The Android Developers Web site has great information for getting started with Eclipse and the Android Developer Tools plugin. Some parts that I think are important are that the code-path to create a new project using ADT is different than just using the Android tools. It isn't a real big deal but the best way to get a decent build script for a build machine is to use the Android create tool. I did find that I could drop a build.xml, build.properties, local.properties, and default.properties into the project directory of an Eclipse-created project and it built and behaved as I expected.
I tried Export -> Ant Build Files but that was terrible. Use android create at least once to get the good scripts. Once you get good build scripts, it would probably be smart to tell Eclipse to only use the Ant build script that was put in place but I'm going to live on the wild side and use the IDE build when doing interactive dev and Ant for 'real' builds.
ADT provides a graphical tool for managing the virtual devices, automatically assumed debug keys on Run As, and has the usual benefits of syntax highlighting and refactoring. There isn't an integrated tool for managing the emulators, that I have seen; that means that once an emulator is started, I have to kill it outside the IDE if it needs to be killed. Along the same lines, I've had a case where the IDE wouldn't start a new emulator but there was one running and ready to take an application image.
Saturday, April 18, 2009
the hard way to get SMS messages in app
My epiphany today was that SMS would be the easiest way to capture expenses like gas and groceries. That's funny, seriously. I decided to see how difficult it would be to get SMS messages into an app. Since I recently set up a Skype account with SkypeIn, I figured I'd see if SkypeIn could accept SMS. In short, it doesn't appear to (still).
The Skype APIs are brilliantly trivial so within a couple minutes of downloading the Python version of the API I had this script running to send my real phone a test SMS message.
That works - I set a real phone number where the 5555551234 is and the real phone gets the SMS instantly. Since I was sure the API was functioning correctly, I tried reading SMS messages. I could see SMS messages so from a real phone I sent an SMS to my SkypeIn number.
Neither Skype (the GUI client) nor the API could see the incoming SMS so I did a little reading and found that landlines are used for SkypeIn so incoming SMS is not an option. I read that there is a company that provides free SMS routing to Skype accounts. The format is 'skype account name message'. Skype then receives the SMS as an Instant Message. I tried it out by sending 'skype mrtidy test another from iPhone' and did get the Instant Message.
Using the code above, I can now see that I have received the SMS message:
I'm pretty bummed about SkypeIn being landline and having no real option for receiving SMS. I thought about my fundamental problem and I could set up a private twitter account specifically for tracking the expenses that we make while out but I'd really prefer SMS or email. The SMS attraction was that it is just 2 fields which makes sense; email has a subject field which is unnecessary for this task.
The Skype APIs are brilliantly trivial so within a couple minutes of downloading the Python version of the API I had this script running to send my real phone a test SMS message.
import Skype4Py

def OnAttach(status):
  print 'API attachment status: ' + skype.Convert.AttachmentStatusToText(status)

  if status == Skype4Py.apiAttachAvailable:
    skype.Attach()

skype = Skype4Py.Skype()
skype.OnAttachmentStatus = OnAttach

print 'Connecting to Skype...'
skype.Attach()

message = skype.CreateSms(Skype4Py.smsMessageTypeOutgoing, '+15555551234')
message.Body = "Hello from sendSms.py"
message.Send()
That works - I set a real phone number where the 5555551234 is and the real phone gets the SMS instantly. Since I was sure the API was functioning correctly, I tried reading SMS messages. I could see SMS messages so from a real phone I sent an SMS to my SkypeIn number.
Neither Skype (the GUI client) nor the API could see the incoming SMS so I did a little reading and found that landlines are used for SkypeIn so incoming SMS is not an option. I read that there is a company that provides free SMS routing to Skype accounts. The format is 'skype account name message'. Skype then receives the SMS as an Instant Message. I tried it out by sending 'skype mrtidy test another from iPhone' and did get the Instant Message.
import Skype4Py

skype = Skype4Py.Skype()
skype.Attach()

for sms in skype.Smss:
  print sms.Type + ' SMS: ' + sms.Body

for chat in skype.Chats:
  print chat.Type + ' Chat'
  for message in chat.Messages:
    print 'Message: ' + message.Body
Using the code above, I can now see that I have received the SMS message:
OUTGOING SMS: short message from python
OUTGOING SMS: Hello from sendSms.py
OUTGOING SMS:
OUTGOING SMS: test with the 1 in it
OUTGOING SMS:
OUTGOING SMS: testing sms from skype
DIALOG Chat
Message: "test another from iPhone [ SMS to Skype message from +15555551234 ]"
Message:
Message:
MULTICHAT Chat
I'm pretty bummed about SkypeIn being landline and having no real option for receiving SMS. I thought about my fundamental problem and I could set up a private twitter account specifically for tracking the expenses that we make while out but I'd really prefer SMS or email. The SMS attraction was that it is just 2 fields which makes sense; email has a subject field which is unnecessary for this task.
Thursday, March 19, 2009
setting up personal wikimedia
I'm a huge fan of Confluence since I get to use it at work and have gotten real familiar with it. Unfortunately, there isn't a personal version of it, that I can find, so for setting up a wiki for personal use I have to turn to something else. I have experience with a few but I'd say my second favorite is wikimedia. Wikimedia has everything I need - this is mainly for Greg and I to keep track of our rocket info like propellants and nozzle info.
That is looking good and the wiki is ready to start using solely through a browser; however, it isn't externally available yet. Since all traffic on port 80 currently forwards from my firewall to an IIS instance, I need to set up a reverse proxy to forward the traffic on from IIS to the internal Linux server hosting wikimedia. I haven't finished setting up the reverse proxy but below are the links that I've been working from. Note that ARR is only avaiable for II7, which I don't have, so it is mostly informational about what I wish I had.
yum install php
yum install mysql
yum install mysql-server
/etc/init.d/mysql start
mysqladmin -u root password '###'
yum install php-gd
yum install php-mysql
cd /var/www/html
tar xzf ~/wiki*tar.gz
ln -s wikimedia-* wikimedia
chown -R apache:apache wikimedia*
http://192.168.0.25/wikimedia/config/

Admin username: admin
Password: ###

Database name: rockets_wiki
Database username: rockets_wiki
Database password: ###
That is looking good and the wiki is ready to start using solely through a browser; however, it isn't externally available yet. Since all traffic on port 80 currently forwards from my firewall to an IIS instance, I need to set up a reverse proxy to forward the traffic on from IIS to the internal Linux server hosting wikimedia. I haven't finished setting up the reverse proxy but below are the links that I've been working from. Note that ARR is only avaiable for II7, which I don't have, so it is mostly informational about what I wish I had.
http://learn.iis.net/page.aspx/489/using-the-application-request-routing-module/
http://iis.net/downloads/default.aspx?tabid=34&g=6&i=1709

http://urlrewriter.codeplex.com/Release/ProjectReleases.aspx?ReleaseId=22618
http://urlrewriter.codeplex.com/Thread/View.aspx?ThreadId=38437
Wednesday, February 04, 2009
moving to jQuery 1.3
I'm finally migrating a site with the ancient jQuery 1.1.4 library (!) to jQuery 1.3. To say I'm excited is a gross understatement. The jQuery team continually blow my mind with smart features and approaches to solve problems. I'm interested in all the features but in particular, I'm anxious to see how the 'no browser sniffing' will work out in the long run. Good stuff.
http://docs.jquery.com/Release:jQuery_1.3
http://docs.jquery.com/Release:jQuery_1.3
Thursday, January 29, 2009
HP puts VT Flag in OS Security
At work we have an HP dc5750 machine that we want to put some HVM VMs on. The processor in the machine is an AMD 4450B that technically supports AMD-V. After installing Xen and booting the machine we found that HVM was not enabled in Xen so we had to go digging around. We looked through all the sensible BIOS options a few times and upgraded the BIOS to the latest version and then finally in frustration looked in the OS Security section and there it was - Virtualization was Disabled.
Thursday, January 15, 2009
Awesome is understatement
Here's something geeky: See's Awesome Nut & Chew Bar. Wowsers those are good - why aren't they available in stores?
Wednesday, January 14, 2009
indirection and perf
This recent post by Phil Windley had a great paragraph in it about indirection and performance.
Good stuff. We all know it - he just has an amusing way of saying it.
You know the saying “there’s no Computer Science problem that can’t be solved with a layer of indirection.” In homage to that, our solution is to redirect from a static URL to the timestamped filename. That’s not ideal, but it works. The downside is the other half of that homily: “there’s no performance problem that can’t be solved by eliminating a layer of indirection.” Still, our measurements show that the price we’re paying isn’t too high.
Good stuff. We all know it - he just has an amusing way of saying it.
Subscribe to:
Posts (Atom)